Although writing a new device driver is fun, it is often time-consuming (programming, testing, maintaining), and sometimes a source of trouble (damn bugs!). Therefore, and whenever possible, recycling as much upstream code as possible is a good idea, and it is indeed common practice.
But what if the device is so similar to a supported one that you find yourself doing nothing but renaming functions and variables, modifying a couple of values, and feeling that you just plagiarized an existing driver? In that case, there is no need to re-invent the wheel, and there are easy ways to add support for new devices in existing drivers. Let’s see how it works with real examples.
Content:
- 1. The trivial case: identical hardware
- 2. Not exactly the same, but pretty similar
- 3. One driver to rule them all (and in the darkness bind them)
1. The trivial case: identical hardware
Sometimes you will find devices that are produced by different manufacturers with no modifications beyond the device name. Other devices are just replacements for discontinued ones, being 100% compatible from a software point of view. In such cases, you could even use an existing driver that supports the same device with a different name. But doing things right in this case is straightforward: usually adding a new compatible string is enough.
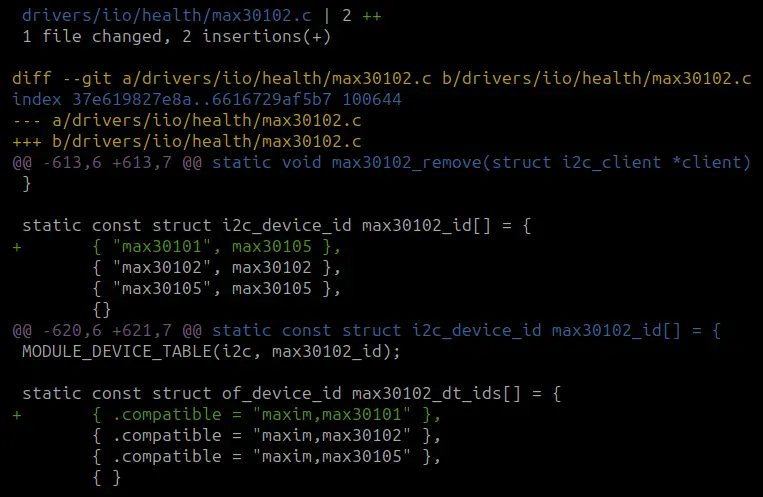
Let’s see an example, where I added support for The Maxim MAX30101, which is a replacement for the already supported –but no longer recommended for new designs– MAX30105. The “support” consists of literally two new lines in the driver, which is actually the new compatible in two structures: one for i2c_device_id (I2C IDs, where we also indicate that it is treated as a max30105), and one for of_device_id (the strings used in a device tree). Don’t panic just yet, more about these structures in the next section!

2. Not exactly the same, but pretty similar
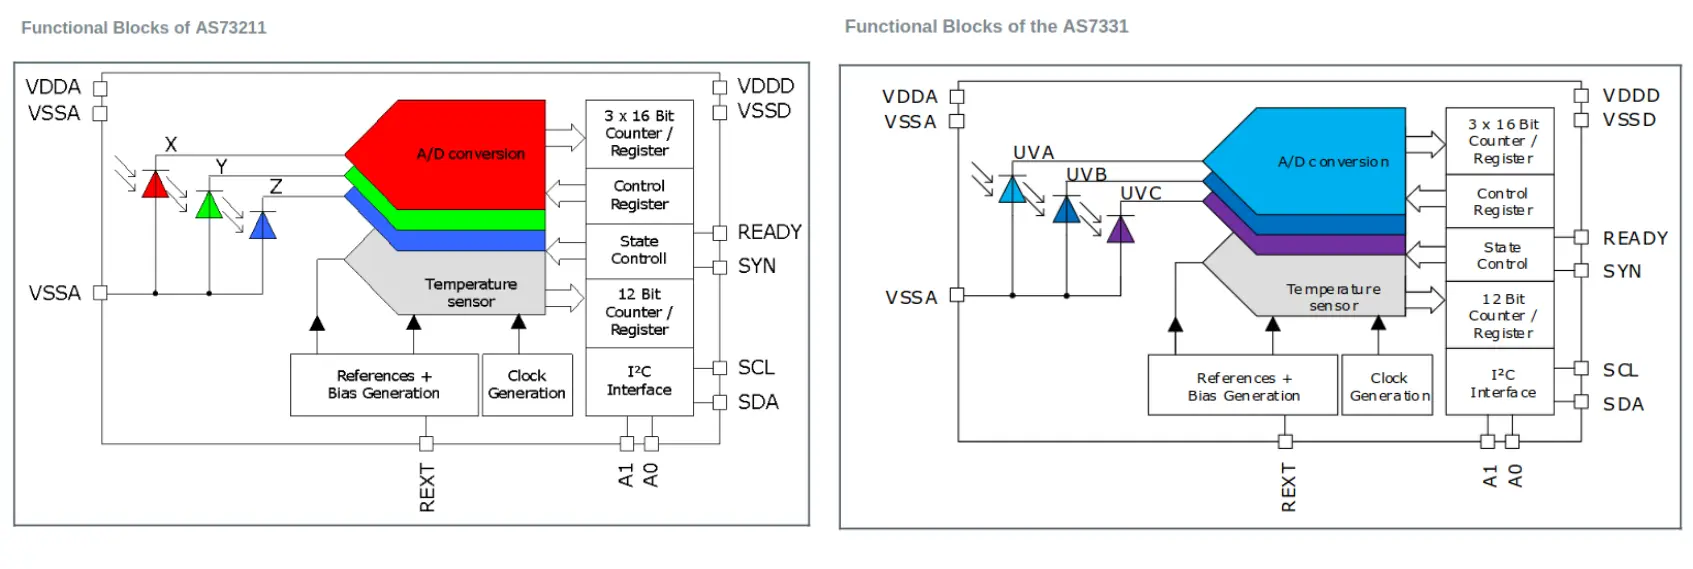
As you can imagine, hardware designers are also happy when they can recycle existing blocks to produce a new device with minimal effort. Why would you design a 3-channel UV light sensor from scratch, when you have already designed a 3-channel RGB color sensor? Instead, you can change the photodiodes and keep the rest: I2C interface, registers, conversion block, etc. That is not only faster, but also safer: the previous device has already been tested by the customers for months/years.
Faster and safer sounds good, and we also want to recycle stuff. If we have a driver for that RGB sensor, we have at least 90% of the driver for the UV sensor. We just need to add the gains for the new photodiodes, and the rest should just work as it did before. I did not choose a random example, so let’s see this in action with two real devices that the Linux kernel supports: the AMS AS73211 XYZ color sensor, which has been supported since 2020, and the AMS AS7331 UV light sensor, which I recently added to the original driver.
In a case like this, we will need a new compatible again, but also some device-specific code (e.g. the new gains aka scales). The infrastructure to provide that code is already there, and it makes use of good old pointers for it. I have already mentioned structures used to provide compatibles like of_device_id and i2c_device_id, which include a field to pass custom data:
/*
 * Struct used for matching a device
 */
struct of_device_id {
	char	name[32];
	char	type[32];
	char	compatible[128];
	const void *data;
};
We are going to use that const void *data pointer to tell the driver what it requires for a given compatible like this:
static const struct of_device_id as73211_of_match[] = {
	{ .compatible = "ams,as73211", &as73211_spec },
	{ .compatible = "ams,as7331", &as7331_spec },
	{ }
};
MODULE_DEVICE_TABLE(of, as73211_of_match);
as73211_spec and as7331_spec are the structures where the device-specific data is stored, and basically the only non-boilerplate code to support the new device:
/**
 * struct as73211_spec_dev_data - device-specific data
 * @intensity_scale:  Function to retrieve intensity scale values.
 * @channels:         Device channels.
 * @num_channels:     Number of channels of the device.
 */
struct as73211_spec_dev_data {
	int (*intensity_scale)(struct as73211_data *data, int chan, int *val, int *val2);
	struct iio_chan_spec const *channels;
	int num_channels;
};

static const struct as73211_spec_dev_data as73211_spec = {
	.intensity_scale = as73211_intensity_scale,
	.channels = as73211_channels,
	.num_channels = ARRAY_SIZE(as73211_channels),
};

static const struct as73211_spec_dev_data as7331_spec = {
	.intensity_scale = as7331_intensity_scale,
	.channels = as7331_channels,
	.num_channels = ARRAY_SIZE(as7331_channels),
};
As you can see, the structure contains a pointer to a function to provide some device-specific logic. That is really useful if the new device differs a bit more from the original one and needs something more than a couple of new constants to work. In this particular case the device-specific logic is trivial, as it only retrieves the right intensity scale depending on the channel, but there is no limit to the complexity it could contain. If you want to see a more complex case, I can recommend you the tps6598x PD controller, where I added support for a device-specific firmware update. In the end, the mechanism is the same and the complexity is hidden in the device-specific code.
How do we retrieve the data we stored in the structures? Easy! We just have to add a pointer to the driver data for the device-specific configuration, and assign the right value in the probe function by means of device_get_match_data() and the compatible being matched:
struct as73211_data {
	struct i2c_client *client;
	// ...
	const struct as73211_spec_dev_data *spec_dev;
};

// ...

static int as73211_probe(struct i2c_client *client)
{
	// ...
	data->spec_dev = i2c_get_match_data(client);
	if (!data->spec_dev)
		return -EINVAL;
	// ...
}
Hey, why did you use i2c_get_match_data() instead of device_get_match_data()? Are you tricking me again? A little trick does not hurt ![]() Actually, the first thing
Actually, the first thing i2c_get_match_data() does is calling device_get_match_data(), and if it fails, it tries to match the I2C IDs contained in the i2c_device_id table. This is an I2C device that implements such an ID table, where the same approach with pointers is used to provide the device-specific data:
static const struct i2c_device_id as73211_id[] = {
	{ "as73211", (kernel_ulong_t)&as73211_spec },
	{ "as7331", (kernel_ulong_t)&as7331_spec },
	{ }
};
MODULE_DEVICE_TABLE(i2c, as73211_id);
This time explicit casting was used because the data pointer type is not void (actually it is an unsigned long integer, and not a pointer, which looks kind of hacky… I know). Would you have used explicit casting otherwise, e.g. (void *)? You would not be the first one, and I almost did when copying code, but the reviewer noticed in time. In order to avoid spreading that unnecessary explicit casting, I removed it from the kernel with this dull series.
A meticulous reader might have found a few more tricks in the code snippets: why does of_device_id from the trivial case (max30102) not have device data (i.e. the data pointer is not assigned), and why is the explicit cast missing in i2c_device_id? In that case, a simple enum (promoted to an integer type without an explicit cast) is enough to handle device-specific code, and there is no need for more complex solutions. The enum value can be stored in i2c_device_id and then retrieved with i2c_client_get_device_id(). Nevertheless, if the driver gets extended to support more devices with bigger differences, then the approach we have seen in this section would be a much cleaner solution than a switch(ID) or if (ID == XX) in the probe function.
Once support for the new device has been added, you should test it to make sure that everything works. Provided there were no bugs in the original code, the only thing that could be wrong is the device-specific code, which is a tiny fraction of the driver. Testing and debugging is always time-consuming, and having a reliable basis for most of the functionality for free is more than welcome. Sometimes you can even test (at least partially) the original device the driver supports by faking the compatible in the device tree. In case of an I2C device, you can also use the i2c-stub module to simulate devices, as I explained in my article about I2C on Linux.
3. One driver to rule them all (and in the darkness bind them)
You might be tempted to take this approach to the extreme and program THE DRIVER: a single file with a million lines and code for any device you want to use. There are many reasons not to do that, but the most obvious is the one that matters for this article: maintainability.
The technique we just saw is widely used in the kernel, but (ideally) only where it makes sense. If you find yourself recycling a driver to the point where the only thing the devices have in common is the driver’s name and maybe the communication protocol, you are obviously doing something wrong. Simple drivers are easier to understand, update and fix. If you are making a simple driver more complex, and the common code is minimal, you are only making things worse. Because there is little common code, you are not reusing much, and therefore not profiting from existing reliable code. What’s the point, then? In that case, writing a new driver might be wiser. But that is beyond the scope of this article. Stay tuned!
Trivia:
How do you know if Linux supports a given device? The fastest and easiest option is to look for the part number with git grep.
What if you are looking for almost identical devices, or the same one with a different name? Easy, use some common sense: look for similar devices from the same manufacturer and check if they are supported, or simply take a look at bindings or drivers in the subsystem the device would belong to, which sometimes are grouped by functionality. It will take you a couple of minutes, which is way shorter and less frustrating than writing a new driver for a device Linux already supports.
Even if you ignore my advice and start writing a new driver right away, you will probably find out while copying code from a driver that does exactly what you need, for a device that seems to do the same as yours. Yeah, you stubborn mule!
Tip 1: look for the first digits of the part number to account for variants and new generations like AD740[0123…].
Tip 2: knowing a bit about the device you want to use always helps to identify a driver that already supports it partially or even completely. The starting point should always be the datasheet.
Tip 3: even if you are sure that two devices are identical, asking the manufacturer is not a bad idea. For example, I did so to ensure that the max30101 was a 1:1 replacement for the max30105 from the point of view of a driver because the pinout was slightly different, and the device description too. I received a reply within a couple of days (manufacturers usually reply promptly, either via email or in their forums) that confirmed my assumption.

