

The day has finally arrived: I’m starting a series on how to write your first device driver for Linux. And no, I’m not talking about out-of-tree modules or examples based on the wonderful but now outdated Linux Device Drivers, 3rd Edition. I’m talking about drivers that use modern APIs and are upstream-ready, so the community can maintain and keep them up-to-date. Thus, I will always assume that we are writing code to send upstream and become a Linux kernel contributor ![]()
I’ll base all my explanations on code you can find in the mainline kernel; whenever possible, from my own drivers or those I’ve contributed to by implementing new features or fixing bugs. The hardware I will use for the examples (SoC and devices) will be simple, and affordable. But don’t worry, you will be able to apply the same concepts to the most complex devices and their drivers as well because Linux loves. Linux loves its code to be homogeneous, at least as much as possible. I’ll tell you more about this in a few minutes.
Regarding the code, it should make no difference whether you are programming a driver for a big tech company or for your little project at home, and you will have to apply the same basic rules regardless the complexity of the hardware. Therefore, I will focus on the key concepts, so you can then build upon for your particular case. I am planning to cover some more advanced features once we have mastered the basics, and hopefully there will be something new to learn even for experienced kernel hackers.
Since there’s a lot to cover, and I want to dive into many details, I expect this series to be relatively long. My goal is that by the end of the series, and apart from analyzing multiples snippets from a different drivers and subsystems, we will have gone through a real driver over 1000 lines of code without skipping any details. In this first chapter, I’ll focus on working with the datasheet and choosing the right subsystem for a device.
Enough for an introduction, let’s get into it!
Content:
- 0. Is the device already supported?
- 1. Skim the datasheet
- 2. Choose the appropriate kernel subsystem
- 3. Read the subsystem documentation BEFORE you start
- 4. Use a modern driver as a template: DON’T reinvent the wheel
- 5. Is your hardware ready?
- 6. What’s next?
0. Is the device already supported?
Checking if a given device is already supported by Linux before adding it to a new design is always a good idea to save time and efforts, and also to avoid being a fool and working for weeks/months on a device that is already supported, or requires some minimal modifications and additions to an existing driver to be supported.
Therefore, the first step should be obvious: look for the name of your devices (and variations of them) in the code. Basic tools like git grep -i will help. You could also take a look at the existing drivers from the subsystems that would cover your devices (more about subsystems later). Another source of information are the devicetree bindings, where you will find supported devices and their properties. Believe me, it is less work than you think (it will take you 5–10 minutes at most), and if you don’t do it, you will waste loads of time.
I wrote an article about extending drivers that you might use if you find a driver that would require minimal modifications to support your device. From now on, we will suppose that the device is still not supported, and adding it to an existing driver would not be worth it e.g. too many modifications and generic code make drivers more complex and less maintainable.
1. Skim the datasheet
If you don’t know what a datasheet or an application note is, don’t worry, we’re about to cover that. On the other hand, if you’re more of a hardware developer, you’ve definitely worked with these kinds of documents before. But watch out, you’ll need to look at them from a kernel developer’s perspective, not a hardware engineer’s. If you have experience with microcontrollers, that’s going to help a lot to write your first driver and translate the datasheet into software, especially if you’ve worked with Zephyr. But even so, there will be quite a few differences, so make sure to pay attention to the details.
A datasheet is simply a document that describes an electronic device. Among other things, it outlines its physical properties (e.g., form factor, operating temperature), electrical characteristics (e.g., supply voltage, operating frequency), and often—but not always—guidelines on how to interface with it and make it work as part of a system. I say “not always” because sometimes that information is split into one or more additional documents, usually referred to as application notes.
Let’s be pragmatic: the first step is to take a quick look at the datasheet for the device we want to control. If there are application notes, you can leave them for later. We’re just looking for a general understanding of what it does, its basic functionalities, and how it communicates with the outside world. This alone will give you a solid idea of what we’ll need from Linux—whether through our driver or existing code that handles some of it.
As you can imagine, the physical properties aren’t all that relevant to the kernel (though they are for circuit design!), and most electrical characteristics won’t be critical in most cases (though surprises can happen, of course). Unless the device is particularly unique, focus your initial read on the most basic electrical requirements (power supply, clocks, dedicated pins) to make sure your system will be able to handle it. Then take a look at what might be interesting for the software: the communication protocol it uses, its main features, and how it stores and delivers information.
Let’s take the HDC3020 temperature/humidity sensor from Texas Instruments that I co-developed at the LKMP as an example. Click on the link: you will see that the datasheet and the application note (in this case, user guide) are very easy to find. Although you will find many more documents under “Technical documentation” covering a wide range of topics, a few of them will only be relevant if you are designing the hardware around the sensor. Interesting topic, but not what we are covering here!
Alright, let’s open the datasheet. The first page is always a short summary to show everyone how great the device is, and how many invaluable features you will get. Half of it will be irrelevant at this stage, but you will get some interesting bullet points as well:
- It has two internal sensors: one for the humidity, and one for the temperature.
- It uses I2C as its communication protocol, and it provides CRC checksums.
- There are programmable interrupts, and a dedicated pin for it.
- There is an external reset.
- Apparently, there are multiple measurement modes.
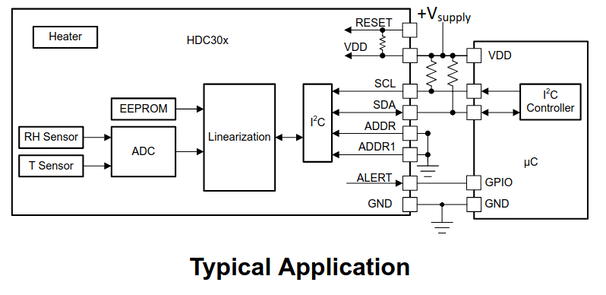
- There is a “Typical Application” block that shows how to connect the sensor.
That last point is an important one at this stage: it shows you what connections between the device and your system will be required. Your first goal will be making those connections properly. That’s often easy, sometimes trivial… and seldom a project on its own, especially for beginners. More about that later. In this example, you will just have to find out how to connect the power supply (VDD and GND), the I2C signals (clock and data), and reserve at least two GPIOs for the interrupt and the reset.
If you scroll down and ignore physical and electrical characteristics, you will soon find that there are indeed multiple measurement modes, all of them relatively slow (up to 10 measurements per second), a table of commands, which seems to be the way to communicate with the device via I2C, and a status register to provide information about the operating state of the device. There is indeed much more information, but with just those points I mentioned, we should be able to manage at least 50% of the device functionality.
You will have to read the datasheet and application notes more thoroughly later on, and sometimes a little note will make you rework a big chunk of code, but that’s part of the job. For now, what you just did is enough work to carry on!
2. Choose the appropriate kernel subsystem
Now that we have a general idea of what the device does, this step should be very easy. Often it is obvious by the nature of the device, and usually there are similar devices already supported upstream. But that is not always the case, and I have already seen a couple of driver proposals that first had to be rewritten before sending them again, this time to the right subsystem.
At least one time it happened because the author did not follow my step no. 0 before writing a new driver: all similar devices belonged to a different subsystem. Moreover, the code was basically useless because none of the modern APIs had been used, but we will leave that for step no. 4.
If you were tempted to send all devices with SPI protocol to the SPI subsystem, stop right there! This is not how things work: the SPI (the same apply to many other communication protocols) subsystem is in charge of providing the SPI functionality to consumer drivers, which will reside under different subsystems. To select the right subsystem, you only have to think about the main functionality of your device. If it is a Real Time Clock (RTC), it does not matter what protocol it uses: it is an RTC and there will probably be a subsystem that covers such devices. Indeed, there is the rtc subsystem under drivers/rtc/
Could you still get it wrong, even if you followed my advice? Yes, in some particular cases, you could. Sometimes there is (slight) overlapping between subsystems, and some devices are not that easy to classify. For example, I have seen a couple of temperature drivers that were first sent to the Industrial Input/Output (iio) subsystem, but ended up being rewritten for the HW Monitor (hwmon) subsystem. The typical applications for the sensor and its operating frequency are often the deciding factors in such cases.
You could ask why the HDC3020 was added to iio and not hwmon, when it can’t take more than 10 measurements per second in its fastest operation mode. The line is rather thin, and this device would work under hwmon just fine, especially considering that it (still) does not support triggered buffers (I will explain them later in this series). On the other hand, it is a general purpose sensor that is not specifically designed to monitor hardware (like the temperature sensor on a motherboard), and similar humidity/temperature sensors like the HDC100 and HDC2010 are already under iio. Having said that, such edge cases are pretty uncommon.
3. Read the subsystem documentation BEFORE you start
Now that we know the right subsystem for our device, we need to find out what the subsystem will expect from us and our code. What is the minimum functionality we have to provide? What kind of documentation and/or tests are expected to be part of the series? Is there anything else I should know before sending my patches to that subsystem?
Many subsystems provide specific documentation to address such questions, and many more. Unfortunately, some subsystems don’t, so you will just have to follow the general rules and recommnedations like the coding style or the guide to submit patches. Either way, I would strongly recommend you to keep an eye on existing drivers to gather common patterns and conventions (e.g. the input subsystem prefers the ubiquitous ret variable to be called error… whatever, just follow suit and let the reviewers focus on what really matters).
Another source of information that I would recommend you to have present is the ABI. If your driver has to expose attributes to userspace, make sure that you follow the definitions under Documentation/ABI/. They are grouped in files whose name resemble the path you would follow to find them. The ABI applies for all exposed attributes, not only for device drivers. For example, you will find the description of /sys/power/state in Documentation/ABI/testing/sysfs-power. Similarly, if you are interested in attributes that USB-C devices expose under /sys/class/typec, you will find them in Documentation/ABI/testing/sysfs-class-typec. And if you need to define a new attribute, make sure that you add it to the right document in that folder, and following the existing structure. That’s something that people often forget, and I have found myself adding missing attributes to hwmon and iio a few times after looking for their descriptions for a driver that would require them. By the way, don’t ever break userspace and stick to the ABI!
4. Use a modern driver as a template: DON’T reinvent the wheel
We will start working with driver code in the next article, but if you can’t wait, make sure that you get the right template. No, you are not going to freestyle your driver. If you want to train your creativity, take a pottery course or paint the walls of your room.
At least for device drivers, you are not supposed to start from a scratch. Instead, you are expected to use the kernel features and APIs as well as common code and patterns found within the subsystem. Do you want to start with a completely empty file? That’s fine, but in no less than 90% of the cases, your code should look like existing upstream code with little variations to address the unique features of your hardware. There is a lot of reliable code that has been used (i.e. tested) for many people during years, so don’t waste your time reinventing the wheel, and simply enjoy what you get for free. Don’t worry, even if you use existing APIs and recycle code, you will have good chances of programming new, buggy code ![]()
Of course, programming a device driver is not just copying, renaming and pasting, and often your drivers will require features that are still not available. Sometimes you will implement a tailored solution for your driver, but there will be occasions where you will add new features to the subsystem core, so other drivers can use them as well. It could even happen that the feature you need should be provided by another subsystem (e.g. power, clock, etc.), and in those cases you will end up working on multiple subsystems at the same time. That is always a great way to learn!
Why did I say that you should base your driver on new ones? Older drivers have been tested and patched for much longer, and they should be more reliable, shouldn’t they? Well… that will depend on how often the driver was used. I have found bugs in old drivers that made me wonder how many people were still using them, and I could confirm that some features had never been used, because they simply did not work and even made the driver crash. I would say that the history of a driver matters way more than its age, and drivers with many patches have usually been more thoroughly tested by multiple users.
Moreover, new drivers will have been reviewed under the latest standards, and they will probably conform to the state-of-the-art APIs. It’s very common that people submit new drivers with old code that has been inherited from legacy drivers, and rewriting those parts to use newer standards is time-consuming (more iterations, testing, etc.).
5. Is your hardware ready?
Anything that has to do with touching hardware is feared by many software developers ![]() Depending on your answers to these questions, your fear will be justified or not:
Depending on your answers to these questions, your fear will be justified or not:
- Are you looking for ideas and don’t you know what device you will get yet?
- Do you know what device you need, but you did not order it yet?
- Do you have the hardware, and is it ready to use?
- You only have a beetle-looking chip. No idea how to connect it to the system?
Let’s discuss all cases.
Looking for ideas
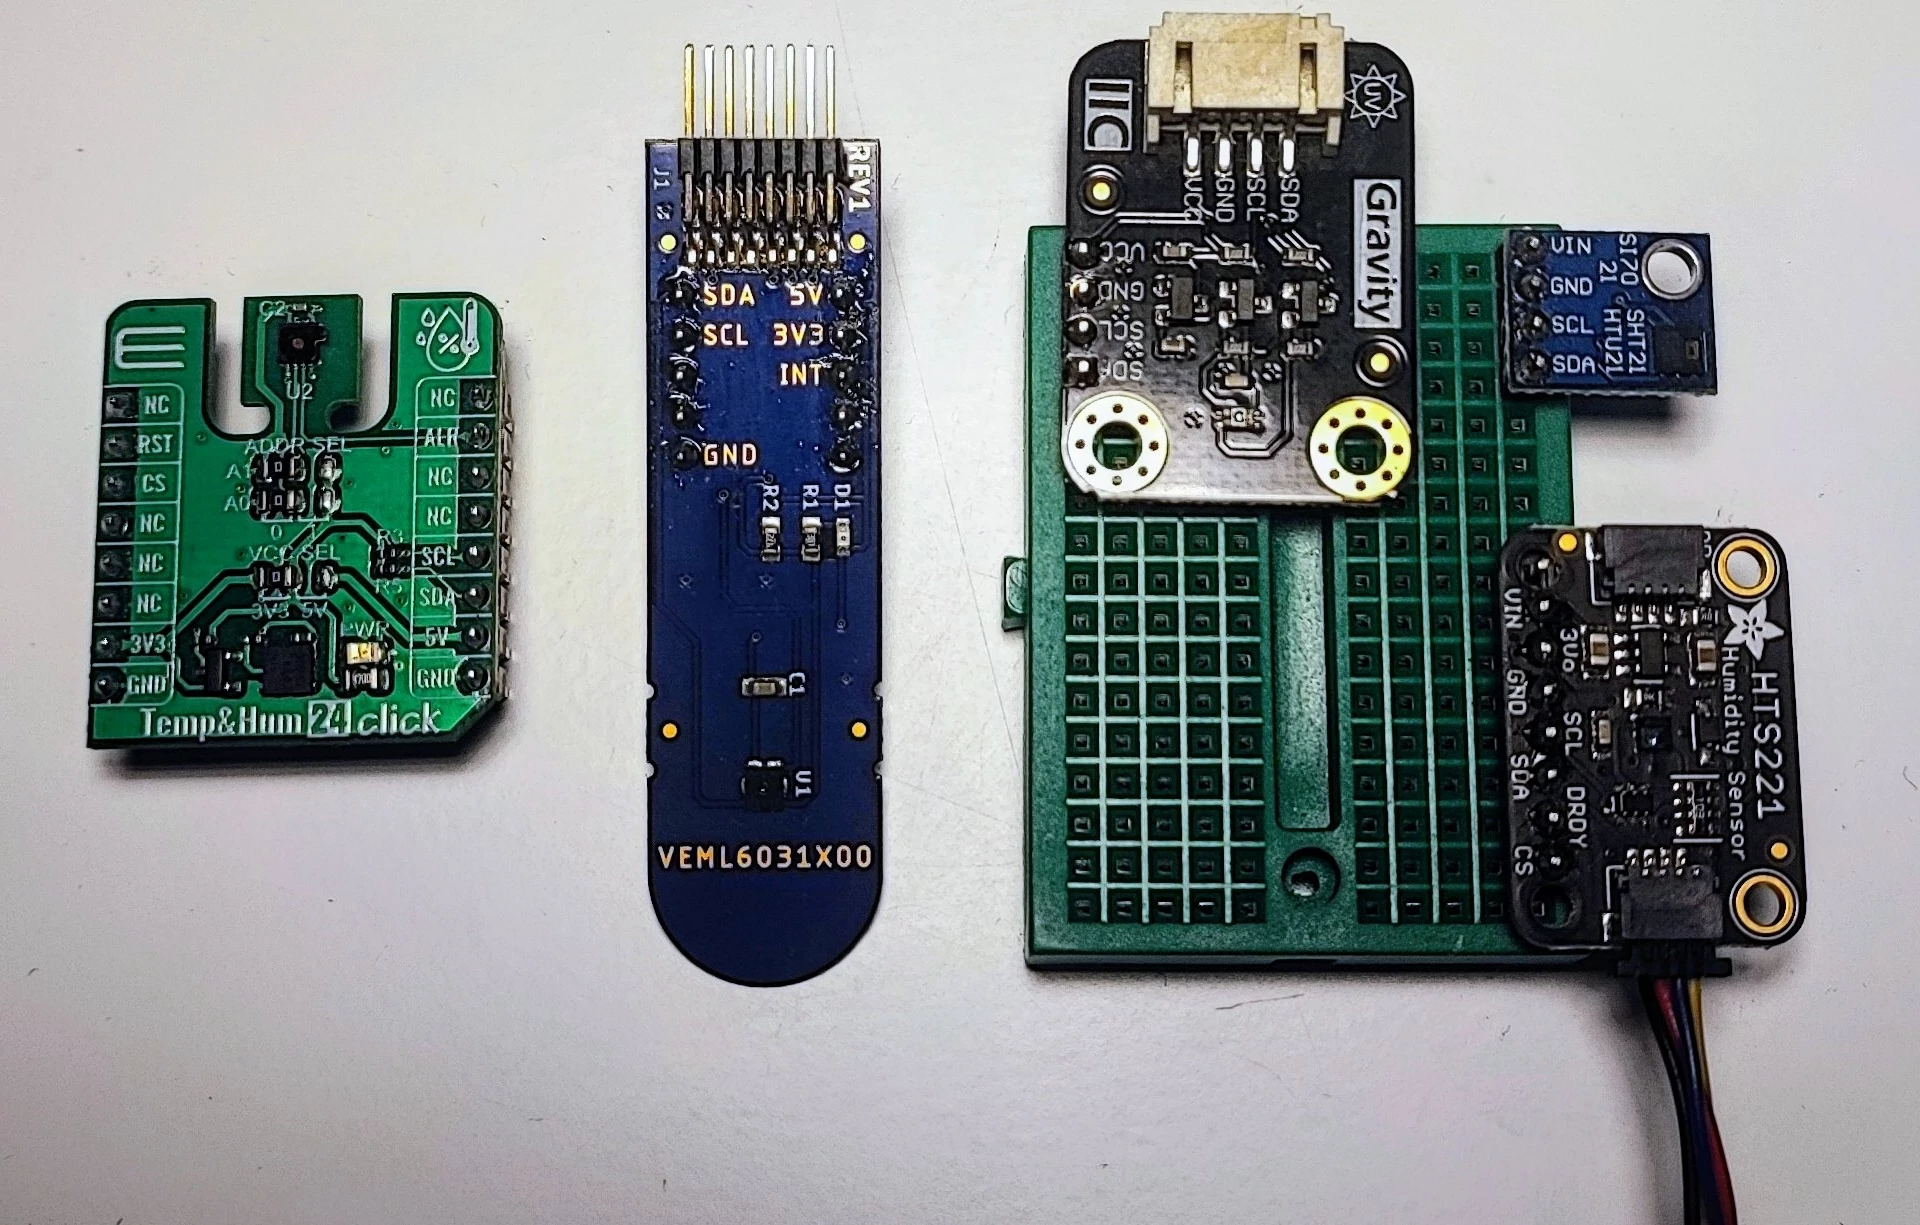
If you just would like to learn how to program a device driver, keep the hardware simple, and you will have fewer problems to worry about. If the device is already integrated in the system you are going to work on, or if you find an evaluation board, you will be ready to focus on the software from the beginning. For example, a couple of LKMP mentees bought cheap breakout boards that could be plugged into a SoC with very simple wiring.
I would also recommend you to look for a device you would like to integrate in a personal project, or even build a project upon the device. If you do so, everything you will learn and implement will have some real use as well as a lot of testing from your side. For example, I have provided support for multiple sensors I wanted to add to a little, fancy weather station. Once you know what kind of device would suit your needs, spend some time searching online (e.g. distributors like DigiKey, Farnell, RS, or more specific for hobbyist boards like Adafruit or SparkFun). Even though Linux supports thousands of devices, it won’t take you long until you find an interesting device that is still not supported.
I know what device I need
In that case, consider what options you have according to how much time you would like to invest in setting up the hardware. If your answer is 0–5 minutes, look for a breakout board and the appropriate wiring (see the section above). If you want to learn more about hardware design, or you did not have an easier option, the next section might help you. Either way, make sure you read 0. Is the device already supported?
While waiting for your device to arrive, you might want to look for ways to simulate its functionality and start programming and “soft-testing”. For example, I mentioned some options for I2C devices in this article. That’s a good and cheap way to get some basic driver before you get access to the hardware, but some more advanced features will have to wait. Anyway, never send a driver upstream without having tested it with real hardware!
Beetle-looking chip
If you already have the device, but it is neither integrated into the system, nor plug & play, setting it up will be a bit more laborious, but (usually) feasible even for hobbyist and beginners. First check if the datasheet provides information about how to connect it to the system. Sometimes you will even find a dedicated document for that. You might find out that you still need some capacitors, resistors, adapters or wires… hopefully not much. Depending on how much you know about hardware, how simple/standard the package is, and how motivated you are, you have different options:
a) Mount your device on a protoboard + SMD adapter if required. Unfortunately for hobbyists, through-hole packages are becoming rare. But you could still use a breadboard if you find an SMD adapter that fits your device. You will have to solder the device, but the process is very simple, and you will be able to connect your device to the system with cheap and easy-to-use jumper wires. By the way, I have seen videos of people soldering BGA packages with hot air and loads of flux, but I would not be surprised if that did not work even after 10 tries.
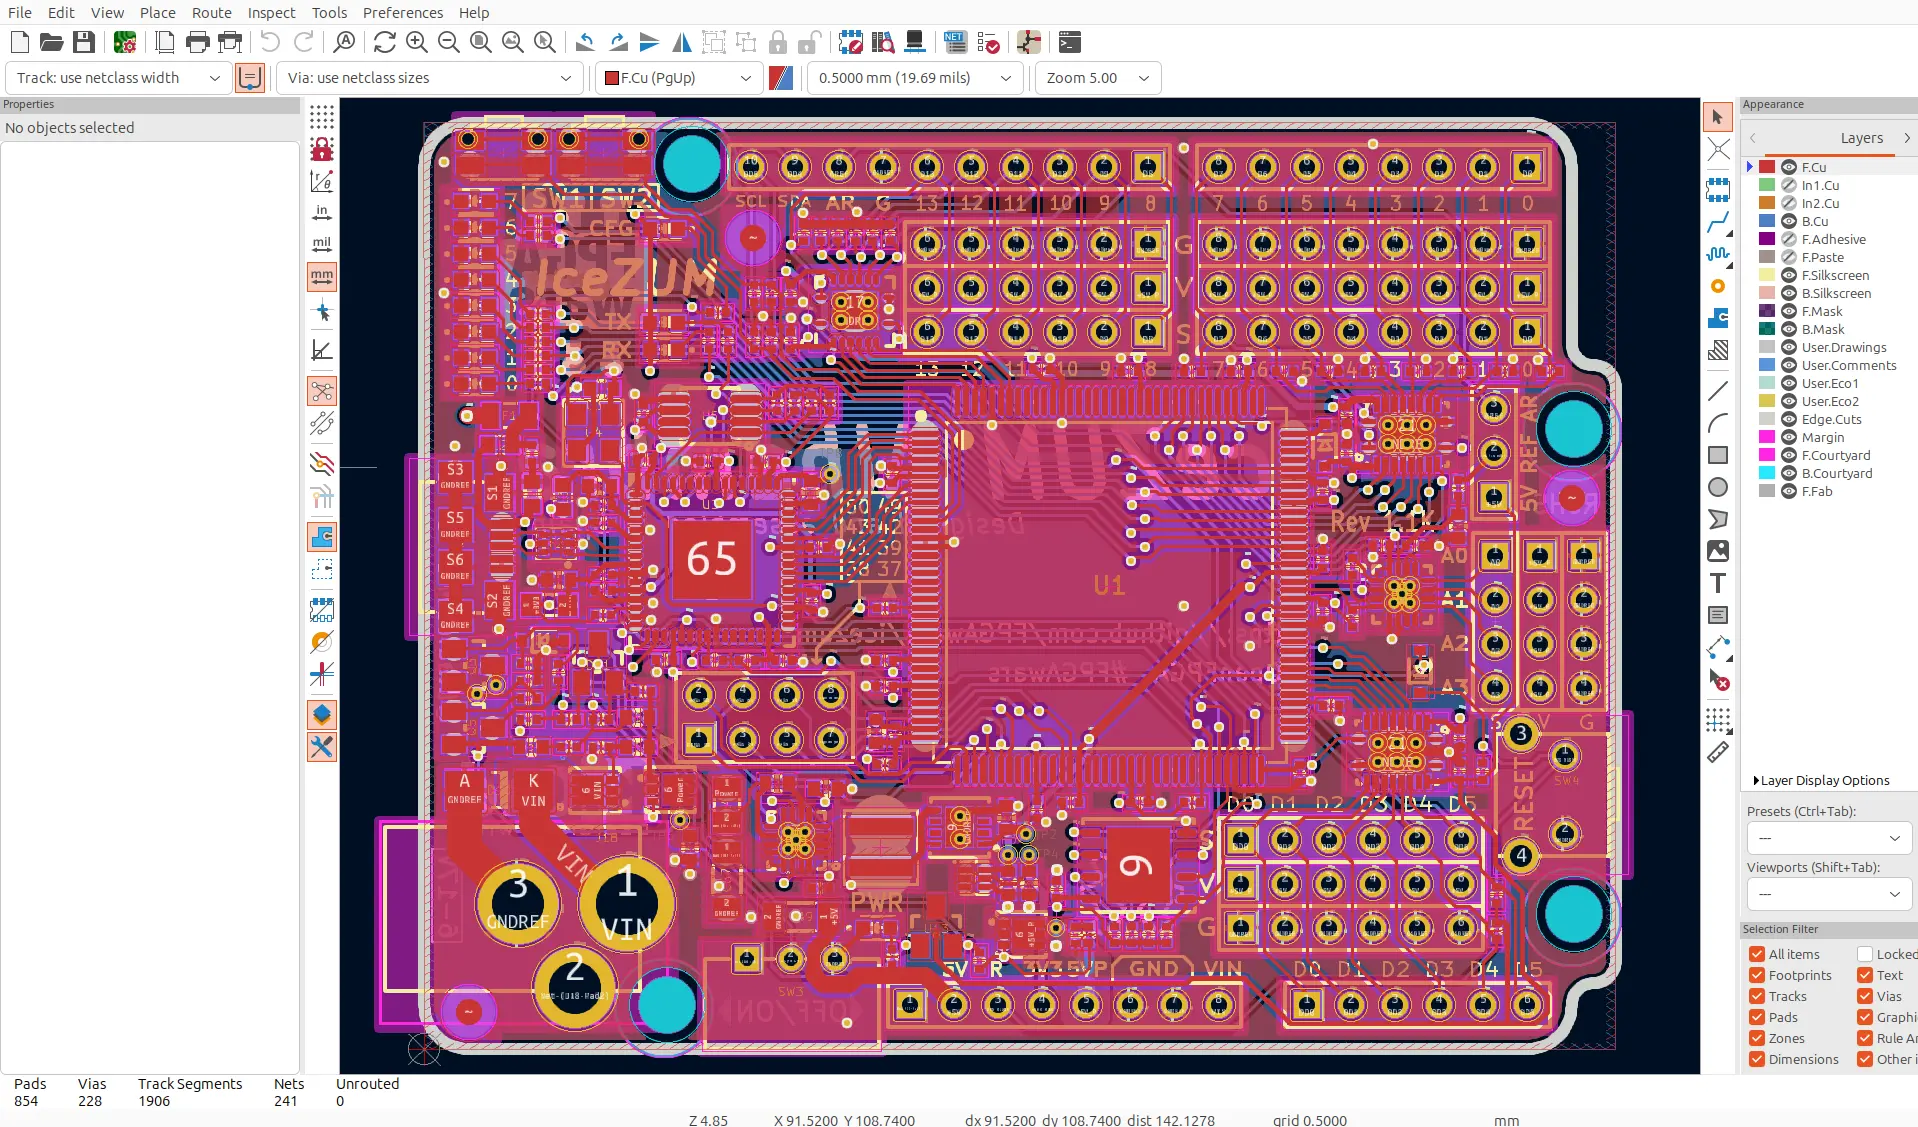
b) Design your own PCB. I would recommend you KiCAD, an open-source, multi-platform EDA, for the design, and a quick search for a cheap manufacturer in your region. For example, I have used multi-cb, which is rather popular in Europe, and everything worked smoothly. Prototypes are usually manually assembled/soldered, but if you don’t have access to a soldering station or the task would be too complex for your skills, look for a manufacturer that also offers assembling. You might have to make some “adjustments” to the HW anyway, so minimal soldering skills will always be welcome. If the package is not simple, this approach will be the only realistic one.
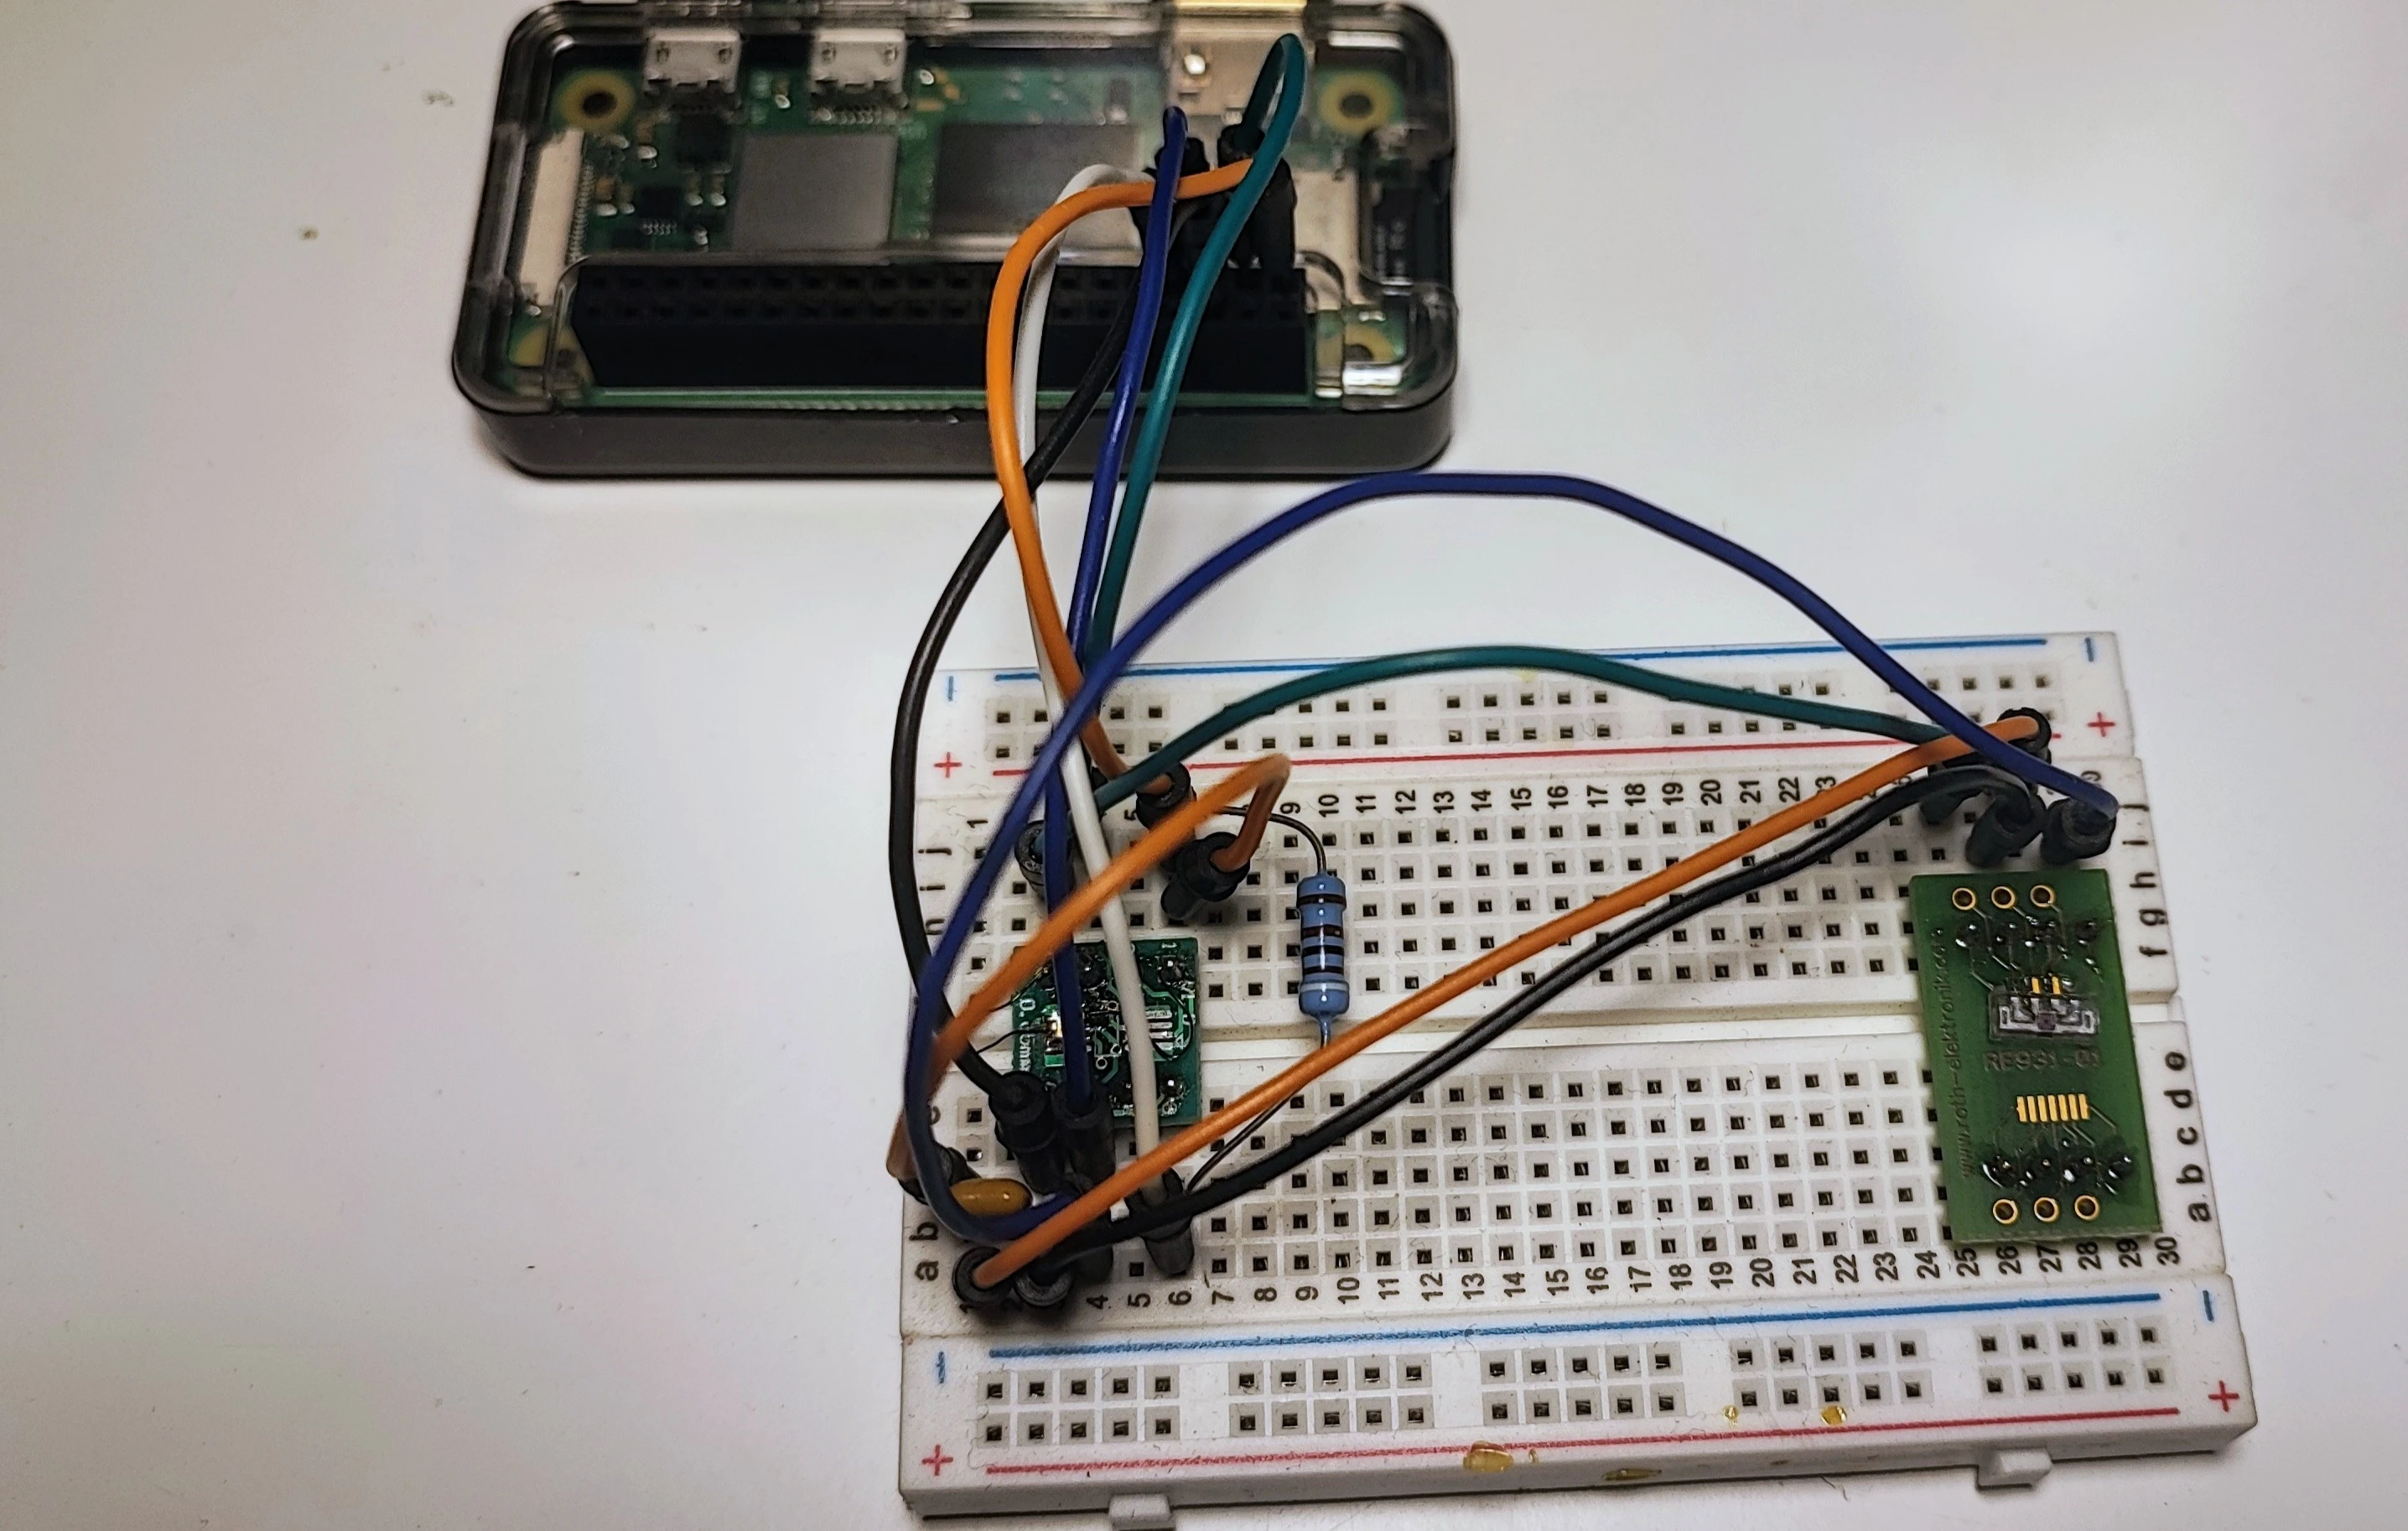
c) Use your imagination and HW-hacking skills. I have chosen this one a couple of times when I had very simple hardware but no compatible adapter, and too little patience to go for the cleaner solution with a PCB. Some solutions that have worked for me were soldering the device on a protoboard or hacking an adapter with a scalpel and some ultra-thin magnet wires to make it suitable for my device. Don’t expect to have the most noise-, vibration- and shock-resistant design ever, though ![]() But it will work for a prototype until you find a better solution. What I would not recommend you is soldering wires to the pins, because that seldom works, and you will have to re-solder many times. Be hacky, but not that hacky.
But it will work for a prototype until you find a better solution. What I would not recommend you is soldering wires to the pins, because that seldom works, and you will have to re-solder many times. Be hacky, but not that hacky.
6. What’s next?
For the next articles I am going to assume that you have a Linux system, preferably based on a well documented and devicetree-based architecture such as ARM64 and RISC-V. I will be using a Raspberry Pi (ARM64) myself, as I have already written articles about how to set it for Linux kernel development. Please check them out if you are going to use a Raspberry Pi as well to save time, but you will be able to follow this series with any other SoC, almost 1:1.
I will also assume that you are ready to connect your device to the system, but that should be no problem after reading this article 😜